Sunday, December 20, 2009

Oreo Cookie Pops

This is a fun project that I found on How Does She? Zac and I made these, and we went through a little trial and error, but now we totally have Oreo Cookie Pop savvy.

Materials Needed:

Oreos

Dipping chocolate (either vanilla or chocolate bark or chocolate morsels)

sucker sticks

sprinkles, M & M minis, or candy eyes

small cellophane bags

ribbon


Melt your dipping medium. This melted quickly and easily in the microwave. Just follow the directions.


I used chocolate bark and I also did Ghirardelli semisweet morsels. The bark was easier to work with, but the morsels taste better and have a gloss to them once they have set.
Open the Oreos carefully:
Dip the stick into the melted chocolate:
Lay it on the Oreo half:
Carefully place the other Oreo on top:
Hold together gently:
I would recommend letting it dry before doing display hands.
Here they are en masse, waiting to be dipped in chocolate.
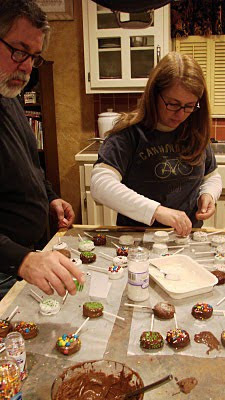
We dipped the Oreos like this and also used a spoon to make sure they were covered:

Zac wanted to make sure to get a picture of these because his (on the right) looked so much better than mine. Maybe he's the one who should have a blog.
After much begging, we were able to talk Gil into getting involved as well.
Gil's was one of the coolest, very yin-yang-esque.

This project is serious, folks.
Here are the finished pops.
Place them in the small cellophane bags and tie with ribbon, yarn, or a snappy scarf:

Thursday, December 17, 2009

Treats in a Pop Top Can

I started to call this post, This Craft is Crazy Cute or Wish I'd Thought of This, but I figured that might make it difficult to find on a Google search. This idea came from a blog called How Does She...

Materials Needed:

pop top can ( I used small cans of peaches)
safe-edge can opener (I got mine at Walmart)
white glue (as usual, I like Alene's Tacky Glue)
cute scrapbook paper or heavy wrapping paper
candies or other treats

Open the bottom of the can with the can opener. The reason for the safety can opener is that it takes off the entire piece, including the rim. Eat the contents or place into a storage container.

Thoroughly wash and dry the container and fill with your choice of goodies. Homemade treats would be even better.

Run glue around the edges and reattach the bottom to the can. Place a heavy book on it while the glue is working.

For the first one I did, I removed the label and used it for a template on my scrapbook paper. Then I cut the paper and glued it around the can.

Apply the paper to the can. As you can see, once I made the template, I didn't remove any more labels. It is just an unnecessary step.

I downloaded this adorable paper from A Print a Day onto light card stock.

To make a template for the top, you have to cut out a V shape to fit it under the pop top. Trace it onto matching paper and glue it to the top of the can.

Just such amazing cuteness.

How great would these be for stocking stuffers? You can use bigger cans, too. Just make sure the bottoms are compatible with your can opener. (Campbells Soup cans aren't, by the way).

You could also place them in cellophane bags and tie with ribbon. I downloaded the tags, too. I printed this tag onto photo paper.

I love this idea and I plan to make them year round. I hope you enjoy making these as much as I did!

Wednesday, December 16, 2009

Quick and Easy Gift

Need a teacher gift or a small treat to add to a gift basket? Buy a scoop and fill it with pistachios, pecans, or whatever your favorite nuts are. Place it in a cellophane bag and tie it with a cute Christmas ribbon.

Quick and Easy Ornament

I had feathers left from my Feather Tree and I wanted to use them to make an ornament. My original intention was to have a single feather in the bottom, but it ended up being pretty full by the time I finished. I was surprised by the beautiful results.

Materials needed:
clear glass ornaments
white feathers
white glue (I like Alene's Tacky Glue)
Martha Stewart snow glitter (or whatever you have)

Take the top off of the ornament. Gently bend each feather and push into the ornament with a toothpick. Continue until you have it as full as you would like. It is actually amazing how many feathers will fit in there. Squirt glue along the top to look like icy snow and cover with glitter. Allow a few minutes to dry and replace top.

It's just that easy.

Tuesday, December 15, 2009

Cookie Cutter Felt Tie-Ons

Anthropologie is one of my favorite places to shop, especially for Christmas surprises. They also have very cute tie-ons for their gifts. This is the one this year, and I happened to have paper that matched it perfectly.

It is made of felt circles that are threaded onto twine. After I looked at it, I got to thinking about how easy it would be to make them, but be a little more creative.

I traced around cookie cutters onto felt with a sharpie.

After I cut them out, I folded them in half lengthwise and cut two small slits in the middle.

Then I threaded them onto twine, which I got at Hancock. (The brown felt has been washed a couple of times to give it a worn look).

I typically use tissue paper only for stocking stuffers, but both of these patterns were really cute.

I loved how they turned out!

Monday, December 14, 2009

Homemade Treats for Your Canine Friends

This recipe was given to me the other day by my friend Jennifer who is an animal lover/rescuer. It has a texture like a meatloaf and she bakes it in a 13 x 9 dish. I decided to try it in muffin tins for individual servings. It is a wonderfully nutritious snack that is easy to make. And perfect for a Christmas treat!

Ground Turkey Dog Treats

1 sweet potato
1 lb ground turkey
1 egg
5 tbsp uncooked old fashioned oats
1/4 tsp garlic powder

Cook sweet potato in the microwave for about 5 minutes. Let it cool and slip off the skin. Mash up and combine the remaining ingredients, using your hands if necessary. Place in a greased baking dish and bake at 350 for 1 hour. If you use muffin tins, bake 20 minutes for mini tins and 30 minutes for regular muffin tins.

After the sweet potato is cooked, combine ingredients.

I used a smaller tin for my Yorkie and a larger one for my Izzy.

Mmmm. They smell good, but don't eat them. They are for dogs. And our dogs LOVE them.

Keep refrigerated. They won't last long.

Sunday, December 13, 2009

Painted Christmas Ornaments

As I shared in my last post, I really enjoy painting Christmas ornaments. I did two this year and I am posting them to show how fun and easy they are to do. They are also very inexpensive.

I got this little resin Santa at Hobby Lobby, where family traditions are started. He was 50% off and I paid $2 for him. Such a nice blank canvas waiting to be splashed with creativity.

I used regular acrylic paint, and it took a couple of coats of the red and maybe about three coats of the white. I used a very tiny brush on the parts where the two colors met. A coat of Mod Podge is an option after the pain dries if you want it to be shiny. I opted for a matte finish this time.

Here he is with his black boots, gold buttons...

...and green mittens.


He looks very much at home among the regulars.

This is a simple wooden ornament of which there are an abundance at both Michaels and Hobby Lobby. It was less than $1.
First I painted it in acrylics.
Then oversanded it a little.
I diluted some brown acrylic paint with water and brushed on some, then wiped it off to give it an aged look. Then I hung it on my tree.

Painting ornaments can be fun for every member of the family. They are also very cute to tie onto a gift for someone special.