Monday, July 30, 2007

Low Calorie Strawberry Shortcake

I was in the grocery store the other day and saw these individual angel food cakes. They inspired me to use them as a base for a dessert that I wanted to be tasty, but also low in calories. I personally do not care for any food or drink that is artificially sweetened because of the aftertaste. However, in my opinion, two exceptions to this are Jello Sugar Free Pudding and Cool Whip Sugar Free Topping. So I combined them to make this easy dessert.


Low Calorie Strawberry Shortcake

1 pkg individual angel food cakes
1 pkg Jello Sugar Free Instant Pudding
(I like chocolate the best for this, but vanilla or cheesecake would be okay, too)
2 cups cold, low fat milk
2 tsp cocoa
1 tsp vanilla
fresh strawberries

Prepare pudding according to package directions. Add 2 tsp cocoa and 1 tsp vanilla. Chill.
Slice or chop strawberries. Sprinkle sugar or other sweetener onto strawberries and refrigerate. (Sugar will help the strawberries to become very juicy and it adds only 15 calories per teaspoon).
Slice the cake lengthwise into 2 layers. Dollop a small amount of pudding onto the bottom layer and place the top layer on. Spoon strawberries with juice onto the top. Spoon Cool Whip onto the strawberries.
(Note: You can do this without the pudding with just the Cool Whip and strawberries).

Calories:
With Pudding: about 200
Without Pudding: about 160
This dessert also provides calcium from the milk and vitamin C from the strawberries and is very low in fat. It is actually fat-free if you make it without the pudding.


Prepare the pudding according to the package directions.
I also added 2 tsp cocoa and 1 tsp vanilla, just to enhance the flavor a little:

Slice cake in half and spoon about 1/4 cup pudding onto the bottom layer. If you choose not to use the pudding, spoon Cool Whip and strawberries onto this layer.

I made one with chocolate pudding for Gil:

And with just Cool Whip for me:

These are delicious and are virtually guilt-free!

Saturday, July 28, 2007

Snow Cone Fun

I will never outgrow my love for snow cones. I remember my dad bringing a snow cone machine home one day. I was about 8 years old. It was shaped like Snoopy from the Peanuts comic strip. It had a hand crank and it took what seemed like forever to make just one snow cone. Even though it was alot of trouble, it was still fun and is a nice memory for me. But, thanks to modern technology, it can now be done in a matter of seconds and with very little elbow grease.

I found this Rival Snow Cone Maker at Walmart for around $20. Then, on the next aisle, I found these amazing asymmetrical bowls, with matching spoons, at $5 for a set of four. They were so cute that I bought three sets. They will be useful for more than just snow cones. Never underestimate the potential funky factor of the products that the Walmart can offer you.


You simply fill the top of the machine with ice cubes:
Then twist the top on, and within seconds the blue receptacle will be full of finely crushed ice:
Walmart also has the syrups. I bought fruit punch and cherry, both of which are yummy. I made a pina colada syrup with 1 part Bacardi mixer with one part water. One thing I discovered, though, is that the Bacardi mixer has tiny bits if pineapple in it and that made it tricky to use the squirt bottle.

Then, very quickly pour the syrup over the ice. I still have not mastered how much to use. Offer more syrup to your snow cone patrons if needed. Today I had my Aunt Peggy, cousin Connie, and Connie's grandson, Aiden over to swim. Connie and I had pina colada and Aunt Peggy and Aiden had fruit punch.

These are best served on an inflatable alligator.


Thursday, July 26, 2007

Friendship


These are my friends Dawn and Debbie, who I have been honored to have as friends for over 35 years. We got together for dinner tonight, as we often do, to catch up with each other, and we had fun reminiscing about kooky things we did growing up. We used to sing together, and once we climbed across a dangerous catwalk above our church sanctuary and out onto our steeple so we could sing "Lift Thine Eyes" to the entire community of Woodlawn. It was unfortunate that no one noticed. We also rolled yards late at night and, even (very affectionately) soaped our pastor's car windows. We confessed it to him the next day and he said we were on his black list, but he said it with a smile on his face. There were many more mischievous deeds that occurred, none that were really bad, but all were really fun.

Debbie and Dawn have been with me through the high as well as the low points of my life. That is true friendship. If you have friends like this, value them and keep in contact with them. Author and critic, John Leonard once said, "It takes a long time to grow an old friend." And an old friend is the very best kind.

Tuesday, July 24, 2007

Mexican Casserole

I had a long day at work yesterday and then went for a 4 mile walk. Needless to say, I was really tired. I didn't want to go to a great effort for supper, but I wanted it to be good. I will have to confess that I used the Velveeta yet again. I had a Kraft Shells and Cheese mix and it had a recipe on the back that I embellished with the ingredients I had on hand. Was it particularly nutritious? Nope. Was it off the charts in sodium content? Probably. Was it easy and did it taste good? Most definitely, YES.

Mexican Casserole

1 ounce box Kraft Shells & Cheese
1 lb ground chuck, browned and drained
6 ounces cream cheese, softened
8 ounces sour cream
1 cup picante sauce ( I like mild Pace)
1 cup grated cheese (your favorite)
Fritos

Prepare Shells and Cheese according to package directions. Pour into a 13x9 pyrex baking dish. Combine cream cheese, sour cream, and ground beef. Dollop onto the pasta and spread. Cover with picante sauce, then grated cheese. Sprinkle Fritos on top. Bake at 375 for about 15 minutes.


Cook pasta and drain. Add "cheese" and stir together thoroughly.

Combine sour cream, cream cheese, and beef and spread on top:
Then picante sauce:

Then cheese and fritos:

Bake about 15 minutes or until cheese is melted and bubbly:

It smells really good and tastes even better. It's also good left over. Okay, so no more Velveeta.

Friday, July 20, 2007

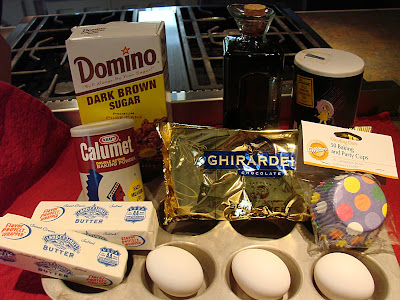
Chocolate Chip Cookie Cupcakes

I found this recipe in a Martha Stewart magazine. The recipe called for chocolate chunks and I used chocolate chips instead. I also added pecans and reduced her oven temperature from 375 to 350.

Chocolate Chip Cookie Cupcakes

1-1/2 cups all-purpose flour
3/4 tsp baking powder
1/2 tsp salt
1 cup (2 sticks) butter, softened
3/4 cup granulated sugar
3/4 cup brown sugar
3 eggs
1 tsp vanilla
1/3 cup milk
8 ounces semi-sweet chocolate (3/4 of a 12 oz bag)
3/4 cup pecans

Preheat oven to 350. Line a 12 cup muffin tin with paper liners and set aside. Stir together flour, baking powder, and salt in a small bowl. Set aside.

Combine butter and sugars in a large bowl and beat with an electric mixer until fluffy. Add eggs, one at a time, and then add vanilla. Slowly add flour mixture, alternating with milk. Stir in chocolate and pecans.

Spoon into muffin cups, almost even with the top. Bake until golden and centers come out clean, about 25 minutes.


Combine flour, baking powder, and salt in a small bowl:

Combine sugars and butter in a larger bowl:

Beat with an electric mixer until fluffy. Then add flour and milk.


Stir in chocolate and pecans:

Spoon into muffin cups. They can actually be filled a little fuller than I did here:

They turned out really well. Very cookie-like.


Monday, July 16, 2007

A Fabulous Supper for the Busy Woman

Today's post is an easy, quick, and delicious meal you can prepare in only minutes.

The menu is:
Roast Beef with Carrots
Mashed Potatoes
Fresh Green Beans
Sliced Tomatoes

You will need:
chuck roast (or your favorite cut of roast)
1 can cream of mushroom soup
1 pkg dry Lipton Onion Soup Mix
1 pkg fresh baby carrots
1 pkg Green Giant green beans (found in produce section)
6-8 small potatoes
chicken broth
sour cream
butter
salt & pepper
ripe, red tomatoes

The morning of your meal:
About 8 hours before you plan to serve your meal, place the roast and carrots in the crock pot. (Note: At this point, you can also chop the potatoes and add. It will save more time later if you don't want to mash them). Combine mushroom soup and dry soup mix. Pour over the roast and vegetables. Turn the crock pot to the low setting and cook for about 8 hours, depending on the roast size.

30 minutes before your meal:
If you didn't add the potatoes to the crock pot, scrub and chop them. Boil them in water or chicken broth for 20-30 minutes. Drain off most the liquid and save in case you need to add some back. Add butter, sour cream, salt, and pepper to taste. Mash up. I leave the peelings on mine and I don't try to get all the lumps out.

6 minutes before your meal:
Pierce the green bean package with a fork and cook on high in microwave for 5 minutes. Add melted butter and salt.

1 minute before your meal:
Slice the tomatoes.

Everyone will think you worked on it all day.


Sunday, July 15, 2007

Olive Oil Muffins

This is a recipe from Giada De Laurentis, my favorite cook from the food network. I watched her prepare it a couple of weeks ago and was very intrigued by the combination of ingredients. This was a sweet muffin, but it contained olive oil and balsamic vinegar. Hmmm... I was compelled to try them and I'm glad I did because they are delicious. They also contain orange and lemon zest, but I added about one teaspoon of each zest instead of two, which gave it just a subtle hint of those flavors. I'm not a fan of heavy citrus.
They are quite moist, but, in my opinion, are best served warm with butter.

Olive Oil Muffins

1- 3/4 cups all- purpose flour
2 tsp baking powder
1/2 tsp salt
1 cup sugar
4 large eggs
2 tsp orange zest
2 tsp lemon zest
2 tablespoons balsamic vinegar
2 tablespoons whole milk
3/4 cup extra-virgin olive oil
2/3 cup sliced almonds, toasted
Powdered sugar, for sifting

Preheat the oven to 350. Place paper liners in a 12-cup muffin tin. Blend together the flour, baking powder, and salt in a medium bowl. Using an electric mixer beat the sugar, eggs, and zests in a large bowl until pale and fluffy, about 3 minutes. Beat in the vinegar and milk. Gradually beat in the oil. Add the flour mixture and stir just until blended. Crush the almonds with your hands as you add them to the batter and stir until mixed. Fill the muffin tin almost to the top of the paper liners. Bake until golden on top and a tester inserted into the center of the cake comes out with moist crumbs attached, about 20 to 25 minutes. Allow to cool. Sift powdered sugar over the muffins.

Wednesday, July 11, 2007

Customized Table Linens

Amby and I recently found bedspreads on sale at Urban Outfitters. They were very simply constructed, basically a 90 x 120" piece of 100% cotton. The prints and color combinations were bright and unusual and we really liked them. Amby bought one to use as a bedspread for the daybed in her study. I bought three to make into tablecloths with matching napkins. I am featuring one of them in today's post.

First, I prewashed the fabric. Then I laid it on my table to determine how much I wanted to cut off. I could have measured it instead, but sometimes I just feel better if I eyeball it. As you can see, it was way too large:

Because I wanted to conserve as much fabric as possible for napkins, I cut from only one side. I moved it to the length I wanted on the left side, then pulled up the corners and used that as a guide for the right side:

Then, allowing some for the hem, I snipped across a couple of inches on the right side and tore the fabric the rest of the way across. It is much more accurate to tear the fabric than to cut it if it is a natural fiber, such as cotton or a cotton blend. It is also much quicker.

I laid out the remaining fabric, and using a napkin I already had as a guide, I tore the fabric into even squares, allowing some extra fabric for the hems I would be adding. I used the already finished edge of the tablecloth as the bottom of each napkin, which eliminated some of the hemming I would have to do. There was enough leftover fabric to make seven napkins.
For the tablecloth and each napkin, I first pressed down the raw edges:

Then folded over a hem and pressed it well:

Then I hemmed it with my sewing machine:

The tablecloth goes well with my kitchen and looks especially festive on my porch. I made it and the matching napkins for $10.


Saturday, July 07, 2007

The Pina Colada

Pina Colada is Spanish for "strained pineapple." It is a drink that is traditionally made with rum, coconut cream, and pineapple.  I use the frozen Bacardi mixer with crushed ice and Sierra Mist. Next to sweet tea, it is my favorite summer drink. It reminds me of being on a tropical island.

This is quick and easy to make, and very refreshing. I often serve it for company with an appetizer before dinner, or as a cool treat on a hot afternoon. It can all be done in a blender or ice shaver. I just purchased an ice shaver, so I used it on about 1/2 the ice before it went into the blender. It produced an exceptionally slushy consistency, but it is still really good if you just use the blender.


Frozen  Pina Coladas

1 can frozen Bacardi Pina Colada mixer, thawed
1 small can Sierra Mist, Sprite, or 7-Up
1 can rum, if desired
crushed or shaved ice

Pour mixer into a blender. Fill the Bacardi can 1/2 full with Sierra Mist and add. Fill blender to the top with crushed or shaved ice. Blend until slushy. Serve immediately. Yield: 4 servings


Pour Bacardi mixer and Sierra Mist into blender. Add ice and blend.


Pour into cups and serve immediately:

It makes it even more fun to serve it in brightly colored cups with fun straws.

Thursday, July 05, 2007

Cinnamon Rolls

Most everyone loves cinnamon rolls. They have an aroma that can distract you from even the most serious of mall shopping trips. When I was growing up, the only cinnamon rolls I ever had were the grocery store kind. I had two problems with those. One, there was never enough of the yummy white icing, and, two, they were always bedecked with raisins. I have no grudge with raisins, but I don't like them in cinnamon rolls. As a child, unfortunately, I had no control over those negative factors. But as a grown-up, armed with a bread machine, I most definitely do.

I use the basic roll dough recipe that is included in my spinach calzone post.

Cinnamon Rolls

1 recipe of Basic Roll Dough
dark brown sugar
1 stick butter
ground cinnamon
chopped pecans
1 box confectioners sugar

Prepare dough according to roll dough recipe. Remove from bread machine and divide in half. Roll out into a rectangle onto a floured surface with a floured rolling pin:


Sprinkle generously with brown sugar, then cinnamon, then add pecans and pats of butter. I do not measure these amounts. The recipe is quite forgiving. As you can see, I also do not roll out a perfectly- shaped rectangle.


Starting with the long side next to you, roll the ingredients up into the dough:

Then slice evenly. I use a serrated knife:


Repeat with the other half, and place the slices in a greased baking dish. This is one whole recipe of bread dough. (These can also be placed in individual cupcake cups for ease of eating and attractiveness).

Cover and allow to rise for at least an hour in a warm, draft-free place. After they have risen, bake at 350 for 20-25 minutes.
Meanwhile, pour the box of confectioners sugar into a bowl and gradually add a small amount of water. Whisk together:


It should be about this consistency:

Smother (yes, I said smother) the hot cinnamon rolls with the yummy white icing:

Now go and barricade the door.

Wednesday, July 04, 2007

Summer Corn & Tomato Salad


My sister-in-law, Carol, brought this salad the other night when we got together for dinner with Gil's family. It was wonderful. It came from the cookbook, Tables of Content, which was compiled by the Junior League of Birmingham. I particularly like cookbooks like this because they are made up of family favorites that have been tested and proved. They are just usually more reliable. As for ingredient amounts, this isn't the kind of recipe that you have to follow exactly, and I adjusted it somewhat. I am going to post the amounts I actually used. The recipe calls for fresh thyme, which was really good, but next time I am going to try fresh basil.

Summer Corn and Tomato Salad

4 ears corn, shucked
5 ripe tomatoes, cut into 1/4-inch slices
3 green onions, chopped (I didn't add onion)
1/4-cup extra-virgin olive oil
1/4-cup balsamic vinegar
salt and pepper to taste
1/2 - 3/4 cup crumbled feta cheese
fresh thyme

Cook the corn in boiling water for 3 minutes. Immediately plunge the corn into a bowl of ice water to stop the cooking process. Let stand until cool and drain. Using a sharp knife, cut the kernels off of the cob into a bowl.

Arrange tomato slices, overlapping, on a large platter. Sprinkle with corn and onion. Whisk the olive oil and vinegar in a bowl until blended and season with salt and pepper. Drizzle the olive oil mixture over the layers and sprinkle with cheese and thyme. Serve at room temperature.
Yield: 8 servings

After boiling the corn, immerse into ice water to stop the cooking process:


Slice the tomatoes and overlap them:

Drizzle with olive oil mixture and sprinkle with remaining ingredients:


What I like the most about this salad is how wonderfully fresh it is. It would go well with most any summer meal. I served it as a side dish with our 4th of July barbecue dinner.