Monday, April 28, 2008

Tuna Noodle Casserole

While I am waxing nostalgic, I decided to post another favorite dish that my mom used to make. She would make this every once in a while when she did not have enough time to prepare a big meal. It is like comfort food to me. I know that this will probably not be everyone's favorite, and it is certainly not a fancy gourmet dish, but if you like tuna casserole, you will love this. I used my favorite basic ingredients to replicate a recipe similar to what she used to make.
I used radiatore pasta, but fusilli (spiral shaped) pasta is also good for this.


Tuna Noodle Casserole

8 oz pasta, cooked and drained
1 cup sour cream
1 can cream of mushroom soup
1/2 - 1 cup grated cheddar cheese
2 cans tuna, drained
potato chips

Combine ingredients and top with crushed potato chips. Pour into a greased 13 x 9" baking dish. Bake at 350 for 3o minutes.


Cook pasta according to package directions and drain:

Combine ingredients and place in a greased baking dish:

To add insult to injury, top with crushed potato chips:

Bake at 350 for 30 minutes. The potato chips should be a nice golden brown:

This is so yummy. It is also quick, easy, and inexpensive to make. I hope you like it.

Monday, April 21, 2008

Oops

Last night I placed a stick of butter in the microwave to melt it. I put the butter in a Tupperware container that I received at my kitchen shower almost 29 years ago. I liked that container because it was the perfect shape for a stick of butter. Well, I thought I set the microwave for 30 seconds, but, no, I got distracted and I actually set it for 30 MINUTES. After I set it, I went upstairs to work on my computer. I started noticing a strong butter smell, a little like caramel icing. I went downstairs and the microwave had been running for about 6 of the 30 minutes and this is what I found:

So much for my container. I let it cool and it peeled off. I'm glad I realized it when I did.

Another time, many years ago, I left water boiling on the stove to make tea and went to another part of the house. All of the water boiled out and the bottom of the pot melted into a large droplet down under the eye. It looked like a modern art sculpture. Too bad I didn't save it. I could have combined it with my Tupperware and made something really funky.

I am posting this to show what can happen in the kitchen if you get distracted like I did. Plus the melted mess was just pretty amazing looking. Be careful when you cook. I truly hope that all of your uncommon kitchen endeavors are safe ones!

Sunday, April 20, 2008

Rubber Ducky Baby Shower

I mentioned in the last couple of posts I did that we were doing a baby shower for one of our nurses. It was a great success! We have a large day room on our floor that we were able to use for it. I wanted to make it as cozy as possible, but hospitals tend to be, by nature, somewhat institutional. So, in lieu of the florescent ceiling lights, I got permission to use a few lamps out of some patient rooms that were not going to be occupied. I ended up using 5 of them. As I was arranging them, I received a message on my pager that said, "Please note that there are lamps being taken out of the patient's rooms," as though we needed to be on the lookout for a lamp thief. It was from one of my friends, Theresa. She then helped me arrange the room, probably out of a guilty conscience for her trickery. We closed the blinds, turned on the lamps, and used bedspreads for the tablecloths on some of the tables. It was very feng shui.

Everyone brought something. This was our main serving table before we had all of the food on it.

She got lots of nice gifts!

One nurse, Linda, brought a gorgeous cake:

I love all things rubber ducky. At home, I cut out a piece of fleece (35"x60") and did a hand blanket stitch around the edges. I wanted to use it as a decoration that was also part of her gift.

I used a white matelasse tablecloth as a base and placed the fleece blanket on top. I used a small cardboard box underneath the blanket to give it height. I bought baby bottles to use as vases. I kept the colored rims on them and tied bows around the tops of them, then filled them with water. Another nurse, Allison, brought these beautiful flowers which matched perfectly. I placed the personalized plaque and mints in Gerber toddler bowls on the blanket, along with a rubber ducky soap dish. She can use all these things after the shower. (You can click on this, and any other photo to enlarge it).

This is Ashley, the honoree. She had fun opening her gifts. Christie is in the background. She wore a ribbon from one of the gifts around her head for a little while. It looked very Rambo.

Ashley got a lot of nice things and we had fun in the process. We are very happy for her and can't wait to see little Austin!

Wednesday, April 16, 2008

Personally Yours

I mentioned in my previous post that we were giving a baby shower for one of our nurses. She is having a boy, and is going to name him Austin. I wanted to make something personalized for her that could also be used as a part of the table decoration. I bought these cute unfinished wooden letters at Michael's.

I decided to paint them alternating colors of blue, yellow, and green. I sanded them a little first to smooth them out.

Then I painted them. It required 2 coats of acrylic paint. It dries quickly, so it didn't take long to complete this process.

After they were completely dry, I sanded them again, especially around the edges. This makes them really smooth and it also prepares them for the next step.

I painted over each letter with brown paint, then quickly rubbed off the excess with a damp cloth. This gives them an antique look.

Gil had a nice piece of wood that he gave me to use as a base, and he glued the letters on with Gorilla Glue.
This is a fun, easy, and inexpensive way to make a very personal gift for someone special.

Tuesday, April 15, 2008

Tiny Flower Butter Mints

We are having a baby shower for one of our nurses at work, and the next few posts will be about that. I wanted to do homemade butter mints. For the basic recipe, go to that post. I added 1/2 tsp of vanilla to the recipe this time, which made them even better.

What I did really differently was that I didn't use a mold. Instead, I rolled it out like cookie dough and cut them with a tiny cookie cutter.

I wanted green, blue, and yellow mints, so I divided the mixture into three balls and added 2 drops of each color to each ball. I used McCormick liquid food color. It starts out being really streaky, like in this picture, but as you knead it, it will blend.

Once the color is blended, it will look like this:

Then I rolled it out with a rolling pin and cut it with a cookie cutter. I carefully lifted each mint off of the counter with a pie server:

Then I let them dry out for several hours. You can loosely wrap them with plastic wrap if you would like:

I am going to serve them in Gerber toddler bowls which she can take home after the shower:


I also added baby spoons to serve them with:

The hardest thing about making these mints is trying to keep from snarfing them all down before you can even take them to their destination.

Thursday, April 10, 2008

Homemade Breadsticks

For breadsticks, I use my recipe for basic bread dough. After I make that in my bread machine, I divide the dough into 15 balls:

I roll each ball out to form a rope:


Then I twist each end of the rope in the opposite direction:

I place the dough on my breadstick pan (Williams Sonoma). I brush them with butter:

Then sprinkle Parmesan cheese on top:

I bake them at 350 for about 20 minutes.

I served them with a salad and Grilled Chicken Fettucine Alfredo.

Tuesday, April 08, 2008

Savory Chicken Triangles

This recipe came from a cookbook from my childhood church. I have made it for many years and it is wonderful. The original recipe was called "Savory Crescent Chicken Squares" because one of the ingredients was Pillsbury Crescent Rolls. This time, however, I used Pepperidge Farm puff pastry, and it was WAY better. I also use more cream cheese than the original recipe. You could make a smaller version of these for a fabulous appetizer.

Savory Chicken Triangles

1/4 cup finely chopped onion
2 tbsp butter
1 pkg frozen puff pastry dough
4 chicken breasts, cooked and shredded
7 oz cream cheese, softened
salt and pepper to taste

Saute onion in butter until tender. Combine with chicken, cream cheese, salt, and pepper. Set aside.

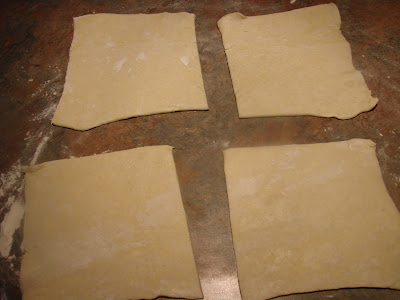
Roll out one sheet of dough and cut into 4 squares. Place about 3/4 cup chicken mixture across middle of dough. Brush edges with water and fold over to form triangles. Place on a greased baking sheet and bake at 400 for about 25 minutes, or until golden brown.
Yield: 8 servings


Combine filling ingredients and set aside. On a floured surface with a floured rolling pin, roll out dough:

Cut into 4 squares:

Place chicken filling diagonally across each square. Seal edges with water:

Fold over and place on greased cookie sheet, Bake at 400 for about 25 minutes:

Mmmmm....
I served them with fresh tomatoes and field peas :

Wednesday, April 02, 2008

Quick and Easy Salsa

As a child, if you had asked me, I could not have told you what salsa was. Now it is practically a staple in the American diet. We were served delicious homemade salsa by some good friends the other night which we loved because it had such a fresh taste and it had no raw onion. Gil and I particularly dislike raw onion, to the point of abhorrence. To the point of getting on people's nerves. So we thought this salsa was particularly awesome. I actually haven't gotten the recipe yet, but I decided to try some of the basic ingredients that she used and created this super-easy version. If you are like most everyone else in the world, and you do like raw onion, then by all means, add it!

Quick and Easy Salsa

1- 15 oz can diced tomatoes (I used Hunt's Petite Diced)
1 can Original Rotel Tomatoes
1 cup fresh cilantro
salt and pepper to taste

Combine all ingredients and puree in blender. Serve with chips.

Once you have the ingredients on hand, you are about 60 seconds away from some pretty amazing salsa.

Tuesday, April 01, 2008

Beef Empanadas

The name “empanada” is a Spanish word that means “to wrap or cover in bread.” An "empanadita" is a mini empanada. I have always really liked pastries wrapped around a filling, whether sweet or savory. So I decided to give create my own recipe. I actually ended up doing both sizes. The empanadita is perfect for an appetizer, and the empanada for an entree. I experimented with a few spices, and I would give it about a 6 out of 10 on the heat scale. I used Pillsbury All Ready pie crust, but you could make the dough from scratch if you wanted to.

Beef Empanadas

1 lb ground chuck
1 cup finely chopped green bell pepper
1 cup finely chopped onion
1/4 tsp cayenne pepper
1/2 tsp paprika
1 tsp cumin
2 tsp chili powder
1 cup chopped fresh cilantro
salt and pepper to taste
1 cup sour cream

1 pkg (2 crusts) Pillsbury All Ready pie crust

Brown ground chuck with bell pepper and onion until beef is browned and vegetables are tender. Drain on paper towels. In a medium bowl, combine the meat mixture with the remaining ingredients.

Roll out pie crust with a floured rolling pin. For the empaniditas, cut with a 2" biscuit cutter. For the empanadas, roll out a small amount of dough. Place a small amount of filling on half the dough and fold over. (See photo below) Brush with an egg wash. (1 tsp water and 1 whole egg, lightly beaten).
Bake at 350 for 20-25 minutes, or until golden brown. Serve with salsa, if desired.


Finely chop onion and bell pepper:

Brown ground chuck, onion and bell pepper together:

Combine remaining ingredients:

For empanaditas, cut with a biscuit cutter:

For the empanadas, I rolled out a small amount of dough:

Then placed the filling inside and folded it over:

I was in a hurry, and wasn't really worried about the edges being perfect when I rolled it out, so I trimmed them with scissors. Then I brushed them with an egg wash and placed them on a greased cookie sheet:

I served them with homemade salsa and my version of Spanish rice.