Monday, January 28, 2008

Thick & Chewy Chocolate Chip Cookies

I found a publication at the grocery store last week entitled The Best of Fine Cooking 101 Tips. It is full of very helpful suggestions for the novice as well as the experienced cook. I highly recommend it as an addition to any cook's library. I plan to post tips from it frequently.

Included with the tips are some great recipes, one of which I am posting tonight. I am forever on a quest for the perfect chocolate chip cookie, and this one, in my opinion, comes pretty close. There is a companion recipe included in the magazine for a thin and crisp version, but the thick and chewy is what I like best. I also simplified the instructions a little bit.

Thick and Chewy Chocolate Chip Cookies


1 - 1/3 cups butter, softened
1 - 1/2 cups brown sugar, packed
1 cup granulated sugar
2 eggs
1 tbsp vanilla
3 - 3/4 all-purpose flour
1 - 1/4 tsp salt
1 tsp baking soda
12 oz semisweet chocolate morsels

1 cup chopped pecans

Heat oven to 375. Beat the butter and sugars until light and fluffy, about 3 minutes.
Add eggs and vanilla and beat on low until blended.

In a medium bowl, combine flour, baking soda, and salt. Add to butter mixture and beat until blended. Stir in chocolate chips and pecans.
Drop by tablespoons of dough about 2 inches apart onto a greased cookie sheet.
Bake at 375 for 9-10 minutes, or until lightly browned.
Cool on a wire rack.

Yield: about 5 dozen

These are very rich and I would not recommend baking them unless there are other chocolate chip cookie fans on hand with which to share them.

Tuesday, January 22, 2008

When Life Gives You Trouble, Make Trifle

We were going to have dinner with friends the other night and I decided to try baking a cake out of the Christmas with Southern Living Cookbook. It is a recipe called Chocolate Caramel Cake. I had a few problems with it, but decided to post it anyway, because the solution could be used for pretty much any layer cake recipe that might not live up to your expectations.

The main problem I experienced was with the cake layers themselves. I should have lined the bottoms of the pans with wax paper, just like my mom taught me, but I got in a hurry and neglected that useful step. I did grease and flour the pans, JUST LIKE THE RECIPE SAID TO DO, but they didn't turn out very well. And, unfortunately, I mean that in a literal way.

The recipe is very arduous, and I'm not going to post it unless some brave reader requests it. I will, however, show the steps along my way.

Here is the cake batter, which is a basic scratch chocolate cake, complete in their greased, floured, and wax paperless cake pans:

I made the caramel filling which went without a hitch:

And the icing was a basic 7 minute icing...

except for the important addition of marshmallows. Other than a very sticky scissor, the icing turned out beautifully.


But, oops, the trouble started when I tried to turn the cake out of the pans. I also allowed them to cool, JUST LIKE THE RECIPE SAID. They were not very pretty.

I went ahead and added the caramel filling to the first layer:

Then pecans and a layer of the icing. But by the time I added the other two layers and tried to frost them, the cake started to crumble into the stark whiteness of the icing. My heart sank because I knew how delicious each component of the cake was. And the cake had turned into a disaster.

So, I got a large, sharp knife, and began to cut chunks of my cake, complete with filling and frosting, and layer them in a trifle bowl. It came almost to the top and I covered the top with Cool Whip and shaved chocolate:

It tasted heavenly, and had I not told them, my sweet friends would have never known that it was actually an impersonation of a trifle performed by a cake gone bad.

So don't lose heart when a recipe doesn't look quite right. There is usually a fix. Just use your imagination!

Friday, January 18, 2008

Easy Crock Pot Beef Tips and Rice

This recipe is a version of the traditional roast in a crock pot recipe which uses Lipton Onion Soup Mix, but with beef tips instead. It is quick, easy, and delicious.

Easy Crock Pot Beef Tips and Rice

3 lb beef tips
2 tbsp oil
1 pkg dry Lipton Onion Soup Mix
1 can cream of mushroom soup
1 cup milk

Season beef tips with salt and pepper. Lightly brown in a skillet in 2 tbsp oil.
Place in crock pot. Combine remaining ingredients and pour over beef tips.
Cook on high for 3-4 hours, or on low for about 6-7 hours. Serve over rice.
Yield: 8 servings

Brown beef tips in oil:

Combine soups and milk. Pour over beef tips and cook in crock pot.

It makes a wonderful gravy:


To accompany the beef tips, I made a combination of brown and wild rice which I cooked in chicken broth.


I served this with fresh baby green beans...

And fresh tomatoes.

Tuesday, January 15, 2008

Coconut Almond Chocolate Chip Muffins

I love Almond Joy candy bars. I have a couple of coconut muffin recipes, one of which I posted a while back, but I wanted to create a muffin that truly captured the essence of an Almond Joy. I have enjoyed the flavor that cream of coconut has added to many desserts I have made, so I decided to incorporate that into my recipe. If you have never used it before, don't be alarmed by how it looks when you open the can. It is pretty clumpy. Just whisk it a little and it will have a similar texture to sweetened condensed milk. I used it as an ingredient in the muffin batter as well as for the topping.
I was very happy with how these turned out - moist from the coconut, crunchy from the almonds, and rich from the chocolate.

Coconut Almond Chocolate Chip Muffins

1 cup sugar
1 stick softened butter
2 eggs
1/4 cup cream of coconut
4 oz frozen coconut
1 tsp vanilla
1- 8 oz bar Ghirardelli semi-sweet chocolate, coarsely chopped
3/4 cup toasted slivered almonds
2 cups all-purpose flour
1 tsp baking soda
1 tsp baking powder
3/4 tsp salt

Topping:
2 ounces coconut
2 tbsp cream of coconut (add more if needed for moistness)

Cream together sugar, butter, eggs, vanilla, chocolate, and 4 oz coconut. Add dry ingredients and mix well. Spoon into a muffin tin lined with 12 paper baking cups. Mix topping ingredients and spoon over each muffin. Bake at 350 for about 25 minutes.
These are wonderful served warm.

Thursday, January 10, 2008

Chocolate Peanut Butter Truffle Pie

This was originally a Southern Living recipe, but I made some major changes in it to better suit my personal taste.

Chocolate Peanut Butter Truffle Pie

1 box of graham cracker crumbs
butter
sugar

1 - 1/2 bags (16 oz) semi sweet chocolate morsels (preferably Ghirardelli)
2/3 cup butter
1/2 cup crunchy or creamy peanut butter
5 eggs, lightly beaten
2 tbsp flour
2 tsp vanilla

Prepare graham cracker crumb crust with butter and sugar according to the package directions. Press into the bottom of a 9" springform pan. Set aside.

Combine chocolate and butter in a small bowl and microwave until melted. Check at 30 second intervals to ensure that it is not overcooked.
Stir in peanut butter until smooth and well-mixed. Allow to cool slightly.

In a medium bowl, lightly beat eggs. Slowly add chocolate mixture and beat for about 2 minutes. Stir in vanilla. Fold in flour. Spoon batter onto the graham cracker crust.

Bake at 400 for 15 minutes. (This will not be firm in the center when removed from the oven).

Cover and chill completely. Remove the sides of the springform pan. Serve warm Peanut Butter Cream onto each plate. Top with a slice of pie. Garnish with chopped peanuts.

Peanut Butter Cream

1/2 cup creamy peanut butter
1 cup sweetened condensed milk
1/4 cup half and half
peanuts for garnish

Combine ingredients and heat in microwave for 40-60 seconds, or until peanut butter is melted. Whisk together until smooth. Serve warm.

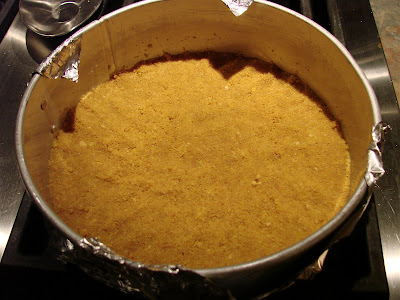
Press graham cracker crumb mixture into pan:

Lightly whisk eggs together:

Combine chocolate, butter, vanilla, and peanut butter:

Once the chocolate is added to the eggs, fold in the flour:

Bake and chill. Remove sides from pan.

Spoon Peanut Butter Cream onto the dessert plate. Place a slice of pie onto the cream and garnish with peanuts:

The resulting texture is very creamy, and the taste is rich in peanut butter and chocolate.
The crunch of the peanuts adds a wonderful contrast.

Tuesday, January 08, 2008

Pesto Chicken and Cheese in Pastry Shells

I was off yesterday and was just not in the mood to go to the grocery store. So, I left myself with the personal challenge of creating dinner with what I had on hand. I actually really enjoy doing this sometimes. I had purchased these Pepperidge Farm Puff Pastry Shells over Christmas, with the idea that I might use them for a festive dish of some kind. They are really easy and fun to use and are quite delicious. I had several types of cheese on hand, as well as some chicken and purchased pesto. The following is my new recipe:


Pesto Chicken and Cheese in Pastry Shells

1 pkg Pepperidge Farm Puff Pastry Shells

Filling:
6 oz softened cream cheese
1 cup ricotta cheese
1 cup grated cheddar cheese
1/2 cup grated Parmesan cheese
3 tbsp purchased pesto (or homemade if you have it!)
salt and pepper to taste
2 - 1/2 cups cooked, cubed chicken

Combine filling ingredients and place in a greased pyrex dish. Place shells on a greased cookie sheet. Bake together at 400 for 10-12 minutes, or until pastry is nicely browned and filling is bubbly.
Remove tops of the pastry shells carefully with a fork and set aside. Remove the uncooked dough from the insides of the shells. Fill with hot filling and serve immediately.


This is what the shells look like uncooked. They are well-marked to show which is the TOP. Place them on a greased cookie sheet, TOPS up.

Combine filling ingredients and place in a greased casserole:

The pastry should be a nice golden brown when done:

Take off the tops with a fork and set aside:

Then carefully remove the uncooked dough from the center and discard:

Fill with the hot filling and serve, with or without the tops:

These turned out to be delicious, with a creamy, cheesy Italian flavor. The filling could also be baked in the small phyllo cups (by Athens) as a appetizer, with or without the chicken.

Monday, January 07, 2008

A Cozy Christmas Tree

I am posting this as an "After Christmas Special" of sorts. I was not able to put this post together before Christmas.

We have several trees that we put out every year, but this year I am posting our main tree and some of its trimmings. I have collected cute, whimsical, and sentimental ornaments for many years, and they are what I use to decorate the tree.

The picture below is a close-up of a bubble light. I have used them for several years. According to Wikipedia, the top of the bubble light is filled with methylene chloride, which has a low boiling point. The low heat in the base of the light is what causes the liquid to bubble. Bubble lights were introduced to the US in 1946. They made a comeback a few years ago and for a couple of years, were available everywhere. Now, when I have to reorder them, I go online to Bronners. The bubble lights not only add a beautiful bright light to our tree, but they also add a sense of movement, which makes the tree quite captivating.


This year, I decided to buy coordinating wrapping paper, which I did a post about a few weeks ago. I really liked the way my gifts turned out:

I tied simple bows instead of doing pom pom bows. It was quick and easy, and the wired ribbon made them look fancy.

Sometimes I like to add a little extra touch. Christmas picks like this can be found in craft stores.

I had to stash Zac's gifts behind the tree because it would be so obvious to him what was inside them. I think he figured it out anyway. He didn't say for sure because he and I had just invented a game called "Guess and Bless", (spoken in a strongly fake southern accent) where, if you guess your gift correctly, you have to give or "bless" it back to the giver from whence it came. The game was very tongue-in-cheek, but apparently was effective, since no one tried to guess what their gifts were.

I like to buy ornaments when we travel. This tie-dye tree came from Virgin Gorda. The little man next to it with a basket of Corona came from Mexico. My quest in Mexico was to find a cheesy ornament. I think I accomplished that.

This is "Frog-with-Human-Hands." He, with the help of Zac, often has insulting things to say to us. He has a Spanish accent and his hands move as he talks.

This was one of Amby's gifts to me. She made the cute little tree ornament. She is amazing and crafty. You could probably special order some from The Knit Owl for your gifts next year.

I hope you enjoyed this small peek of Christmas at my house.

Friday, January 04, 2008

Handmade Bookmarks

My husband, Gil, is a very well-read individual. Not only does he read often, he usually has about 4 or 5 books going at one time. A very complex mind with an insatiable desire for knowledge. This is his bookcase (which he built, by the way). And these are not all the books he has.

I decided that he needed some bookmarks to aid him in his extensive literary perusal. So, one afternoon before Christmas, I made him some.

These are the materials I used:

heavy white cardboard
scrapbook paper
stickers
craft glue stick
tiny tassels
hole punch

I decided on a good size, and traced it onto the white cardboard and cut it out:

Then I cut out scrapbook paper in the same size to cover the front and back of the cardboard:

I used a craft glue stick to attach the paper to the cardboard. I had to trim them a little to make sure the edges were even:

I found these cool file folders at Anthropologie for Gil's stocking and decided to color copy one for one of the bookmarks:

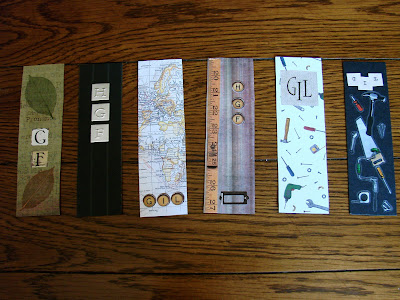
Here they are. I incorporated woodworking and travel, and on some, just his initials:

I took them to Office Depot and had them laminated. They became very thick at this point and I had to get Zac to punch holes in them for me. Then I threaded the tiny tassels through the holes at the top.

I was happy with how they turned out and they made wonderful stocking stuffers. The reason one is missing is that it is holding his place in a book somewhere.