Showing posts with label crafts. Show all posts

Tuesday, January 29, 2013

Open Up a Can of Worms

(Note: I am reposting this from a couple of years ago.)


Not real worms, of course.


I like to send Amby and Nathan a box of Valentine surprises every year. For one of the surprises, I decided to make the pop top cans I posted about last Christmas, except this time with custom labels. For a complete tutorial on how to make these, go here.

I have downloaded a large variety of fonts from dafont.com. I used Printshop for Mac and pulled up a blank page. Then I typed in their names and nicknames in various fonts. I thought that black on white with a single red heart would look cool.

I printed the labels onto white card stock and cut them into the size that would fit the cans I chose. You can gently remove the original can label and use it as a template if you need to.

I filled the cans with Brite Crawlers. I glued the bottoms back on and placed two heavy books on top of the cans for about 30 minutes. I tried Alene's Clear Tacky glue this time and really liked it.

Ahhh... the finished product. Nothing says I love you quite like a can of worms.

I tucked them away in their Valentine box and sent it off to Oklahoma.

This project is really fun and is suitable for any occasion!

Monday, January 28, 2013

Felt Fortune Cookies

This is a Martha Stewart project. The link to it can be found here. I didn't do it exactly as she suggested. I actually got ideas from a couple of her commenters.

Materials Needed:
felt
pipe cleaners or wire
hot glue
candies
fortunes

First of all, I thought her suggested circle size of 4-1/2" was too small. I made a circle (just under 5") on my computer and printed it onto card stock. I used it as a pattern for my felt circles.

Martha suggested wire to place across the middle. I used a pipe cleaner which I trimmed with a wire cutter.

I also used hot glue because it's faster. Don't burn your fingers.

Print or write out a fortune to place in the cookie. I googled funny one-liners and printed some of those. One of my favorites was, "The severity of the itch is inversely proportional to the ability to reach it." Another one was, "Knowledge is knowing a tomato is a fruit; Wisdom is not putting it in a fruit salad." Who doesn't love a little after dinner sarcasm?

You can also place candy inside, which I found to be quite tedious. Maybe a smaller piece of candy would work better. The Hershey Kiss did work, but I had to fanagle with it a lot.

Fold over:

Be careful to grasp the candy as you pinch the edges together:

Then fold at the pipe cleaner:

This was an arduous project, but I did finally get the hang of it, and I will definitely do it again. These would be fun for other occasions as well.

"Before you criticize someone, you should walk a mile in their shoes. That way, when you criticize them, you're a mile away and you have their shoes."

Saturday, November 19, 2011

Dollar Tree Custom Candleholders

I like to have pretty matching candles for all of my table settings. I also like to make something useful out of a Dollar Tree find. I was able to do both for this table setting in my dining room. I have done this project before with a smaller candleholder here. I found a great tablecloth with 8 matching napkins on sale at World Market. It has a beautiful, brightly colored print on it. I happened to have different shades of tissue paper that matched the colors in my tablecloth. I bought 5 of the thick square holders at the Dollar Tree. This project was easy and it took only a few minutes to do.


You will need:
Elmer's or Alene's Tacky Glue
tissue paper
paintbrush
glass candleholders

Tear the tissue into small pieces. Reserve the edges for the tops of the holders. The straight edge looks better. I've mentioned the World Market tissue paper before. It's really pretty because it has fibers in it that show when the candle is lit. It looks like handmade paper. No, I don't work for World Market. I should, though. If you don't have a World Market in your area, here is a link to buy the tissue paper. It's called Mulberry Tissue and it comes in 2 colors per pack.

Paint the glue onto the container with a paintbrush. Dilute the paint with water if it's thick.

Add the strips of tissue, one overlapping another, until it is covered. You can see the upper edge of it in this picture and how nice it looks to not be ragged on the top.

I really like how they turned out. Definitely not like I bought them at the Dollar Tree.

I love candlelight. So cozy and peaceful.


These would be great as gifts, too!

Wednesday, October 26, 2011

Super Creepy Halloween Crackers

We had a Halloween lunch at work the other day, and I wanted to make some special treats for my friends. I decided to make personalized Halloween crackers filled with candy. The full tutorial with measurements, etc, can be found here.

I realized that I didn't have any Halloween scrapbook paper, so I searched online and found a great website from the UK called Activity Village. They had some very fun patterns.

I printed the paper onto 8 1/2 x 11 white card stock. You can cut two from each page.

I organized my candy so that everyone got the same amount.

I made personalized labels with a very scary font that I found on dafont.com. I also added spooky eyes.

And, voila! A basket full of super creepy treats.

Wednesday, March 30, 2011

Birdcage Candleholders

I am glad that spring is here for many reasons, one of which is getting to have dinner on the back porch again. I was having girlfriends over the other night and wanted to add a couple of fun new things to the porch to welcome my guests. I was at T J Maxx, and about to buy a large lantern for a candle, when Zac talked me into buying a large birdcage-esque container. Considering its size, I was surprised it was only $24.

I already had this uber cool moss ribbon that I purchased in Fairhope, and have just been waiting for a reason to use it.

I threaded it around the bottom of the cage.


I placed a pillar candle into a glass cylinder and then sat in on a wrought iron stand. It fit inside perfectly.

I covered the table with one of my favorite old tablecloths.


It made for a nice cozy welcome.

Oh, and I liked the black one so much that I bought this pretty white one, too. This one came from Garden Ridge. It was only $14.

These birdcages are a beautiful, yet inexpensive way to add a lovely bit of candlelight to any part of your home. Thanks, Zac.

Sunday, February 13, 2011

Glass Etching 101

"Would you like to see my etchings?"

A guy actually asked me that on a first date back in my college days. Turns out he was an artist and really did have a portfolio of etchings. I'm fairly sure he used that line a lot, though. Lame.

I have wanted to try glass etching for quite some time now, and it turned out to be really easy. I did learn some of it by trial and error, however, and I hope this post will prove to be helpful to those of you who want to try it.

The supplies you will need are:
Etching Cream
Glass stencils
Rubber gloves
Small stencil brushes
Lots of paper toweling
Something glass to etch onto (Dollar Tree has lots of options)

I found the etching cream and stencils at Michaels. Hobby Lobby has them as well.

Place the stencils on clean, grease-free glass, and make sure it adheres well.

Dab a generous amount of the cream onto the stencils. Be VERY careful not to go outside the stencil. You might want to block it off with tape. I had a mishap or two because I didn't use tape and some of the cream etched where it wasn't supposed to.

Leave it on for about 15 minutes.

Rinse it off in the sink. I know I don't have gloves on, but you are supposed to wear them.


We found these "Decorative Accents" at the Dollar Tree. They are some sort of polymer that absorbs water. We had to have them. Plus they were only a dollar.

They are marble-sized, and are very squishy and slippery.

The label says to keep them away from pets.


I sat a candle holder inside the glass I etched, and sprinkled some Decorative Accents in between. The extra designs you can see in this picture are what I did around the top on the other side.

It's really pretty when the candle is lit.

My friend Meagan came over the other night to do crafts with me. She etched a design onto a square candle holder.

Zac and Meagan's boyfriend, Dustin worked on candle holders as well.


This is Meagan's. I love her polka dot design. Such a creative idea.

Dustin actually poured candle wax into the container and made his own candle. The initials he etched didn't show up well, so he went over them with a red Sharpie. Very cool.

Zac poured his candle also, but first he colored some Decorative Accents with food coloring and poured them into the bottom. Then he poured in the wax. It turned out to be very interesting and volcano-esque. He outlined his letters with red Sharpie as well.

Oh, and thanks to Zac and Dustin, we know that Decorative Accents are not flammable.

Happy Etching!

Monday, May 31, 2010

Tie Dye, Part One


I love to tie dye. If I could establish a lucrative career creating clothing and accessories out of hand-dyed fabric, I would do it in a heartbeat. But since no one is beating my door down to buy my creations as of yet, I guess I will stick to just doing it for fun.

I had so many pictures that I decided to divide my tie dye projects into two parts. This post will cover the basics, and part two is going to be how to tie dye onesies for babies. Even divided into two parts, this post is really long. Hopefully some of my trial and error will be helpful to you so that you are happy with your results.

I have tried two kinds of dye. One is the basic powdered Rit dye which has been around for as long as I can remember. It is very inexpensive and can be found at Walmart as well as most grocery stores. Rit dye is very intense and concentrated. It also comes in a liquid, which I haven't tried yet, but plan to. It seems more convenient and easier to mix to create other colors. Rit has a fabulous website which gives tutorials on various techniques and recipes for your own color creations. You can order from this site as well. Go here to see it.

There are also Tie Dye kits by Tulip, which are very convenient. They offer a variety of colors, such as turquoise, fuschia, and lime green. These are available at Walmart, Michaels, Hobby Lobby, and Hancock.


Tulip recommends soda ash to soak your shirts in before dyeing them. It is supposed to make the color adhere better. I honestly can't tell that it helps. And it smells weird. Whether you use soda ash or not, your shirt should be prewashed and damp before you tie dye.

Be sure to cover your surface with large plastic bags. The dye can leave permanent stains.

Have plenty of zip lock bags or saran wrap handy. You will need to let you shirts sit and cure for several hours. This is hard to do, by the way. I am always so curious to see how they turned out and I rarely wait as long as I should.

So, the items you will need are:

t-shirt, etc to dye (prewashed and damp)
dye of choice
rubber bands
rubber gloves
squirt bottles (Walmart-kitchen section-99¢)
large garbage bags to protect counter or table
ziplock bags or saran wrap


One easy thing I've done is just to dye a t-shirt all one color. I poured the whole package of dye into a large pot of boiling water and dissolved it. Then I dipped the shirt into the dye. The two factors that determine the intensity of the color are how hot the water is and how long you leave the shirt in the dye. I always save some of the dye I make and pour it into squirt bottles because it is reusable and it keeps for a long time.

Here is a shirt that I dyed pink. I left it in the dyebath for about 30 minutes. It is just a Hanes t-shirt (men's small) that I got in a pack of 5 at Walmart. I love how it turned out. It is really soft and comfy and looks cute with jeans.


I bought a plain beige t-shirt at Hancock (they are in the tie dye section) and decided to dye it orange. I left it in the water for about 15 minutes, stirring it every once in a while.

I took it out of the water and squeezed it out in the sink, being careful not to burn my fingers. It seemed a little boring to me, so with the middle of the shirt as my starting point, I placed rubber bands around it about an inch apart for a total of 6.


I filled a squirt bottle with 1 part clorox and 1 part water and shook it up really well. Then I squirted it onto every other space between the rubber bands. I let it sit for about 8 hours, then rinsed and washed it.


This is how it turned out. Very funky.

I had a plain white t-shirt that I got on a trip. I livened it up a little by dyeing it turquoise. I liberally squirted the Tulip dye onto it while scrunching it up in my hands.

As you can see, it ends up a much lighter color once it dries. I really like it, though. Much better than the white.


I have dyed several tank tops. Hancock has these nice simple white ones. They usually run $3.99-$4.99.

I divided it into 3 sections with rubber banding and added a different color to each section.
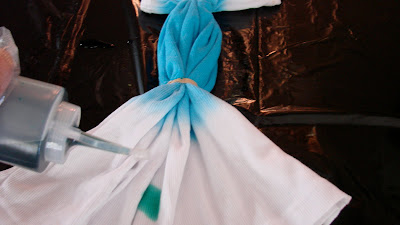

Here is how it looked. This is also after several washings. If I do this color combination again, I will put the purple in the middle. The turquoise and green are a little too similar and blended into each other a little too well.

This is another Hanes t-shirt.

The spiral technique is one of my favorites and it's very easy to do. First decide on where you want to center the inner circle. Then place a fork on that spot.

Begin to turn the fork clock-wise, twisting the fabric along with you.

Continue turning the fork...
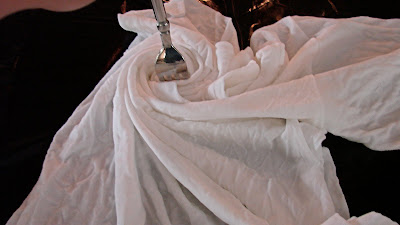

...until you have a circle, kind of like a cinnamon roll.

Place rubber bands across the circle and divide the shirt into 4 or 6 sections.

Color each section on the top, them flip it over and color the bottom as well.

This is how that shirt turned out.

This is a cool shirt that Amby made for me. It is one of my favorites.

You can also dye a shirt to match something. I had some army green shorts and I dyed this tank top to match them. I used camo colors, but added a touch of purple to make it more girly.

Most importantly, be careful washing any clothing that has been dyed. I always hand wash mine a couple of times first. Then I wash in cold water only with like colors. The color can bleed onto your other clothes.

I hope that this lengthy tutorial is helpful. Stay tuned for more.