
Friday, June 01, 2012
Cornbread Muffins
My mom and I created this cornbread recipe about 25 years ago. It is a key ingredient to the dressing recipe that my mom and I also created. I will post that recipe in plenty of time for Thanksgiving.
Cornbread
1 cup self-rising cornmeal (not cornmeal mix)
1/2 cup all purpose flour
1/2 cup butter, melted and cooled slightly
2 eggs
1-1/2 cups buttermilk
1/8 tsp salt
1 tsp baking powder
1 cup frozen shoepeg corn, thawed, (optional)
Preheat oven to 450. Mix together flour, cornmeal, salt, and baking powder. Add eggs, buttermilk, corn, and butter. Pour into a greased muffin tin and bake for 15-20 minutes.
Yield: about 12-14 muffins.


Saturday, May 26, 2012
Shrimp and Edamame
 This is another delicious recipe selection from Eating Well for a Healthy Heart by Dr. Philip A. Ades. The actual name of the recipe is Edamame Succotash with Shrimp, but I wasn't a fan of succotash growing up. This is nothing like what we were served in the school cafeteria. It is fabulous. The edamame is the substitute for the lima beans which are usually in succotash. I used bacon that was already cooked. It is more expensive, but much less greasy and messy to prepare.
Shrimp and Edamame
2 slices bacon (I used 4), cooked
1 tbsp olive oil
1/2 small onion, chopped
1 red bell pepper, chopped
1 tsp minced garlic
1-1/2 tsp fresh thyme
1 - 10 oz pkg frozen shelled edamame, thawed
1 - 10 oz pkg frozen corn, thawed
1/2 cup chicken broth (reduced sodium if desired)
2 tbsp cider vinegar
1/4 tsp salt (I used 1/2)
1 pound raw shrimp, peeled
1/4 tsp lemon pepper
balsamic vinegar
1. In a large nonstick skillet, sauté onion, bell pepper, thyme, and garlic in olive oil until tender. Stir in edamame, corn, broth, vinegar, and salt. Bring to a simmer, reduce heat to medium low and cook for about 10 minutes.
2. Sprinkle shrimp on both sides with lemon pepper. Scatter shrimp on top otf the vegetables and cook until the shrimp is pink and cooked through, about 5 minutes.
3. Add crumbled bacon. Top it off with a few drops of balsamic vinegar.
Yield: 4 servings
307 calories 9 g fat (1 g sat, 4 g mono) 30 g protein 491 mg sodium
High in Vitamin C, Vitamin A, Iron, and Selenium
To easily remove fresh thyme leaves from the stem, grasp with one hand and run your fingers from the top to the bottom of the stem.
 Heat oil in skillet.
 Sauté onion, garlic, and red pepper, and thyme until tender.
 Add edamame, corn, chicken broth, vinegar, and salt. Cook for about 10 minutes.
 Sprinkle shrimp with lemon pepper. (I was out of lemon pepper so I just used black)
 Add shrimp to skillet and cook for about 5 minutes.
 Add bacon and top with balsamic vinegar. I served this as a one-dish meal.
Saturday, November 19, 2011
Dollar Tree Custom Candleholders
 I like to have pretty matching candles for all of my table settings. I also like to make something useful out of a Dollar Tree find. I was able to do both for this table setting in my dining room. I have done this project before with a smaller candleholder here. I found a great tablecloth with 8 matching napkins on sale at World Market. It has a beautiful, brightly colored print on it. I happened to have different shades of tissue paper that matched the colors in my tablecloth. I bought 5 of the thick square holders at the Dollar Tree. This project was easy and it took only a few minutes to do.
You will need:
Elmer's or Alene's Tacky Glue
tissue paper
paintbrush
glass candleholders
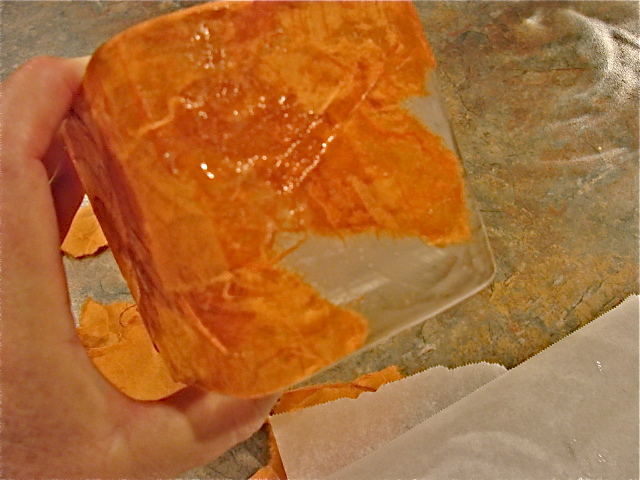
 Tear the tissue into small pieces. Reserve the edges for the tops of the holders. The straight edge looks better. I've mentioned the World Market tissue paper before. It's really pretty because it has fibers in it that show when the candle is lit. It looks like handmade paper. No, I don't work for World Market. I should, though. If you don't have a World Market in your area, here is a link to buy the tissue paper. It's called Mulberry Tissue and it comes in 2 colors per pack.
 Paint the glue onto the container with a paintbrush. Dilute the paint with water if it's thick.
 Add the strips of tissue, one overlapping another, until it is covered. You can see the upper edge of it in this picture and how nice it looks to not be ragged on the top.
 I really like how they turned out. Definitely not like I bought them at the Dollar Tree.
 I love candlelight. So cozy and peaceful.
 These would be great as gifts, too!
Friday, November 18, 2011
Pretzel Candy
This is a very quick and easy candy recipe that Amby told me about. Different versions of it can be found all over Pinterest. You will need pretzels, Rolos, and M&M's.
Cover a cookie sheet with parchment. Lay out the pretzels and place a Rolo on top of each one.
 Bake at 350 for 1-2 minutes. This is just to get the Rolos slightly melted. Lightly press an M&M into each one. I used peanut M&M's but you can use your favorite.
 Chill until hardened. These are very tasty and really cute for a party.

Cover a cookie sheet with parchment. Lay out the pretzels and place a Rolo on top of each one.
 Bake at 350 for 1-2 minutes. This is just to get the Rolos slightly melted. Lightly press an M&M into each one. I used peanut M&M's but you can use your favorite.
 Chill until hardened. These are very tasty and really cute for a party.
Wednesday, October 26, 2011
Super Creepy Halloween Crackers
We had a Halloween lunch at work the other day, and I wanted to make some special treats for my friends. I decided to make personalized Halloween crackers filled with candy. The full tutorial with measurements, etc, can be found here.
I realized that I didn't have any Halloween scrapbook paper, so I searched online and found a great website from the UK called Activity Village. They had some very fun patterns.
 I printed the paper onto 8 1/2 x 11 white card stock. You can cut two from each page.
 I organized my candy so that everyone got the same amount.
 I made personalized labels with a very scary font that I found on dafont.com. I also added spooky eyes.
 And, voila! A basket full of super creepy treats.

I realized that I didn't have any Halloween scrapbook paper, so I searched online and found a great website from the UK called Activity Village. They had some very fun patterns.
 I printed the paper onto 8 1/2 x 11 white card stock. You can cut two from each page.
 I organized my candy so that everyone got the same amount.
 I made personalized labels with a very scary font that I found on dafont.com. I also added spooky eyes.
 And, voila! A basket full of super creepy treats.
Sunday, October 23, 2011
Mossy Pumpkin Wreath
(Sorry I have been away from here for so long! I've been busy with work, family, and other various doodads. I have several ideas just waiting in the wings, and I should be able to get them posted over the next several days.)
Autumn is such cozy time of year and I love to decorate for it. I wanted to do a wreath for my back porch door and I found a picture of a beautiful one on Pinterest. There was no tutorial for it, so I had to improvise. It turned out to be really fun, although it was a bit time-consuming.
The supplies you will need are:
styrofoam wreath, preferably green, not white like mine
green paint (if your wreath turns out to be white like mine)
2 large bags of moss
about 5 small pumpkins
hot glue gun
long strip of burlap
Mod Podge Clear Acrylic Sealer
 As I mentioned, my wreath was white, so I had to paint it. Mossy green spray paint would have been an ideal choice, but all I had were various shades of green acrylic paint, which I mixed together.
 Oddly enough, it worked.
 I painted it on the wreath and it took a couple of hours to dry. You don't have to cover it perfectly.
 Once the paint is dry, you can glue the moss onto the wreath a piece at a time. I tore some of it to fit. I don't have a photo of this step. Sorry. It's probably because I was too busy burning my fingers.
Once the moss is on the wreath, glue the pumpkins on. Make sure you use lots of glue. After I glued them on, I interspersed bits of moss between the pumpkins and glued that in as well. You will be able to see that in the last photo. Spray with acrylic sealer. The moss will shed if you don't.
 I tied on the burlap strip as a hanger and hung it on my door.
 I recommend this project! It was fun to do and I loved the result.
Autumn is such cozy time of year and I love to decorate for it. I wanted to do a wreath for my back porch door and I found a picture of a beautiful one on Pinterest. There was no tutorial for it, so I had to improvise. It turned out to be really fun, although it was a bit time-consuming.
The supplies you will need are:
styrofoam wreath, preferably green, not white like mine
green paint (if your wreath turns out to be white like mine)
2 large bags of moss
about 5 small pumpkins
hot glue gun
long strip of burlap
Mod Podge Clear Acrylic Sealer
 As I mentioned, my wreath was white, so I had to paint it. Mossy green spray paint would have been an ideal choice, but all I had were various shades of green acrylic paint, which I mixed together.
 Oddly enough, it worked.
 I painted it on the wreath and it took a couple of hours to dry. You don't have to cover it perfectly.
 Once the paint is dry, you can glue the moss onto the wreath a piece at a time. I tore some of it to fit. I don't have a photo of this step. Sorry. It's probably because I was too busy burning my fingers.
Once the moss is on the wreath, glue the pumpkins on. Make sure you use lots of glue. After I glued them on, I interspersed bits of moss between the pumpkins and glued that in as well. You will be able to see that in the last photo. Spray with acrylic sealer. The moss will shed if you don't.
 I tied on the burlap strip as a hanger and hung it on my door.
 I recommend this project! It was fun to do and I loved the result.
Subscribe to:
Posts (Atom)