I love fudge. Especially at Christmas. This is a great way to make the gift of fudge even more fun and special. You can make these with your favorite recipe, or with the recipe I have included in this post, which is for Fantasy Fudge. My mom used to make Fantasy Fudge when I was little and I believe that it is hard to improve on its creamy texture and rich chocolate flavor.
Supplies needed:
15-20 cookie cutters
large cookie sheet
aluminum foil
cooking spray
1 recipe of Fantasy Fudge
small cellophane gift bags
ribbon
Fantasy Fudge
3 cups sugar
3/4 cup margarine
1 can (5 oz.) evaporated milk
1 pkg. (12 oz.) semisweet chocolate pieces (I recommend Ghirardelli)
1 jar (7 oz.) marshmallow creme
1 cup chopped nuts
1 tsp. vanilla
M & M minis
Combine sugar, margarine and milk in heavy 2 to 3-quart saucepan. Bring to a full rolling boil, stirring constantly. Continue boiling 5 minutes over medium heat or until candy thermometer reaches 234° F., stirring constantly to prevent scorching. Remove from heat.
Stir in chocolate pieces until melted. Add marshmallow creme, nuts and vanilla. Beat until well blended. Pour into a greased 13-by-9-inch pan.
Cool at room temperature. Cut into squares.
Makes 3 pounds.
Cover cookie sheet with aluminum foil and spray with cooking spray. Then spray the inside of each cookie cutter with cooking spray and place them on the foil:
Make the fudge. Mmmmm....
While the fudge is still very warm, carefully spoon it into each cookie cutter. Decorate them while they are still warm, also. The first time I made them, I decorated them with candy sprinkles, but M & M Minis are more colorful and they blend better with the taste of the fudge. You can use your fingers to press the fudge into the corners if you need to.
Place in refrigerator for at least 2 hours. Then place in individual bags and tie with ribbon. See how much better the M & M's look?
For one gift, I used a small white bucket. I placed a paper towel in the bottom to add height:
Then I covered that with paper shred:
I placed the fudge inside and sprinkled a few Hershey kisses around it, and added a cute tag.
For other gifts I used slightly larger baskets and added Christmas crackers that I'd made. (That post should follow tomorrow).
Navigation menu
▼
Monday, December 22, 2008
Fun and Easy Gift Wrap
I found these cute marshmallow lollipops at the Dollar Tree this year and thought they would be great to top presents with. I found the paper at World Market and the ribbon at Michael's, all on sale.
You can also find colorful gift bags at Michael's at Walmart. They are a blank canvas for you to decorate. The foam and alphabet stickers came from Hancock Fabrics. (Click to enlarge, if desired).
All this takes is a little forethought. Putting them together takes only minutes.
You can also find colorful gift bags at Michael's at Walmart. They are a blank canvas for you to decorate. The foam and alphabet stickers came from Hancock Fabrics. (Click to enlarge, if desired).
All this takes is a little forethought. Putting them together takes only minutes.
More Martini Glass Fun
This is another easy decoration using martini glasses. I found these pretty ones at the Dollar Tree. It is amazing what you can find there.
Supplies needed:
2 martini glasses
2 ornaments
fresh greenery or flowers
artificial snow (epsom salt or kosher salt can also be used).
Fill the martini glasses with the artificial snow:
Remove the metal tops from the ornaments and fill with water. Place on top of the snow and fill with greenery or flowers:
I found this at the container store in Atlanta several years ago. It reminds me of the "angel hair" my grandmother used to have that we weren't allowed to touch because it was made of fiberglass.
I nestled some of it on top of the snow. It made it look more magical.
Saturday, December 20, 2008
Personalized Christmas Wreath
This is a variation on an idea I saw in a magazine. I made one for a friend and one for me. You can vary on this basic idea, depending on your color and style preferences.
Supplies needed:
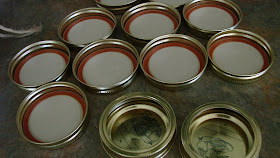
Ball jar tops and rims (one for each letter of your last name)
Alene's Tacky Glue and/or hot glue gun
Rust-oleum brown textured spray paint
Rust-oleum hammered copper spray paint
tube of Rub n' Buff paint in gold
wooden ring
wooden letters
acrylic paint for letters (I used red and brown)
fresh greenery
wire
Glue Ball jar tops into the rims and allow to dry thoroughly:
Paint with about 2 coats of brown textured paint. Then pass over each lid with a spritz of hammered copper paint. It gives an aged look:
If desired, rub on a very small amount of gold Rub n' Buff with a soft cloth:
I found this wooden ring at Michael's. It was perfect for what I wanted to do. They have them in a larger size, also.
Glue the lids across the bottom of the ring:
I bought these letters at Michael's, also. I painted them red, then rubbed on some brown to antique them. The name "franks" is plain red. The name "walker" has been painted red, then antiqued. You can do these in whatever color you like. After they have dried, glue each letter to a lid.
Wire fresh (or artificial if you prefer) greenery to the top. This is the finished wreath:
You can remove the greenery after Christmas and store it to use again.
Friday, December 19, 2008
Icy Candleholders with Fresh Greenery
I saw this amazing idea at Big Red Kitchen. She did a gorgeous layered centerpiece, but for the sake of time, I did something very simple. Check out her blog and see what she did. She also has some great looking recipes.
Start out with a glass container. I used a vase. Place a pillar candle into the container. Then scrunch up some plastic wrap down into the bottom. I used a knife to get it down into the corners:
Then add enough water to cover it:
It immediately starts to look like partially melted ice:
Add some fresh greenery and berries, and you are done. And it will keep looking icy wonderful regardless of the temperature!
Wednesday, December 17, 2008
Bundle Up Your Candles!
Last year, after Christmas, my son Zac brought me a surprise from the retail store where he worked. It was several yards of a continuous and colorful scarf which had been used as a prop and discarded. I tucked it away for a year and pondered what to use it for. When I pulled it out this year, I first decided to cut off a nice length and make myself a cute scarf, which I did. I simply turned in the raw edges and hand-stitched them.
Then I thought I could use some of it to cover candle holders. (I realize that 6 yards of continuous colorful scarf might not be available just anywhere, but any tube scarf can be used for this project. Old Navy, among other places, has them).
This is what I used:
2 cylinder vases (Walmart $1.99 each)
2 pillar candles (Garden Ridge)
miscellaneous buttons
Alene's Tacky glue
a sharp scissor
tube scarf
Cut your scarf the length of your vase, plus about 5 inches extra on the top and bottom. Then thread it on like this:
This raw edge can be rolled down to the top of the vase:
Then they will look like this:
I glued buttons onto the fabric. I don't recommend hot glue for this. These were a door prize at the Christmas class I did last weekend:
I did a set for myself as well. I used a white quilted twin bedspread for my tablecloth because I thought it looked cozy and wintry. Then I added some fresh greenery from my yard:
Very simple. Very different. Since they have more of a winter than a Christmas look to them, I plan to leave them out through January.
Tuesday, December 16, 2008
Christmas Class at Tammy's
I taught a cooking and craft class at my friend Tammy's house last Saturday. This is what the back of my Jeep looked like after I loaded it up to go over there:
We had lots of fun. Tammy's house was perfect for it. We had different stations set up for each craft. At this table, we made Christmas crackers and filled them with candy. (I will post the directions this week).
This was the station where specialized wax paper was made:
In the kitchen, we made croutons, soup, and dressing, and we tucked chocolate kisses inside of chocolate cookies:
It was really fun. The best part was getting to be with friends.
Thank you to everyone who came to the class, and a special thanks to Tammy for hosting it!
Shot Glass Crudites
Sunday, December 14, 2008
Slow Cooker Chicken and Dressing
If you are a true southern cook, you probably not only love dressing, but you are very partial to your own recipe. I am no exception to that. (Amby has some amusing observations on dressing versus stuffing, which is the food of Yankees. And to all of my non-southern readers, although we take our dressing very seriously here, this post is meant in fun).
I found a great recipe for a combination of chicken and dressing which can be made in a crock pot. I thought that was a great concept, but I didn't like many of the ingredients. So this recipe is actually just a slightly altered version of my dressing recipe with chicken added. The original recipe also called for a rotisserie chicken, but I don't like dark meat, so I just boiled some chicken breasts.
Slow Cooker Chicken and Dressing4 -6 small chicken breasts, cooked and shredded
1 recipe cornbread (to follow), crumbled
10 slices of day old bread, crumbled
2 stalks chopped celery, sauteed, then chopped in food processor
1 small onion, chopped, sauteed, then chopped in food processor
1 tsp sage
1 tsp kosher salt
1/2 tsp pepper
4 eggs. lightly beaten
4 cans cream of chicken soup
Combine ingredients and place in a greased 6 qt crock pot. Cook on low for 4-5 hours, or on high for 1 - 1/2 to 2 hours.
Cornbread
1 cup self-rising cornmeal (not cornmeal mix)
1/2 cup all-purpose flour
1 tsp baking powder
1/4 tsp salt
1 stick butter, melted
1-1/2 cups buttermilk
2 eggs
Combine ingredients. Pour into a greased muffin tin. Bake at 450 for 20 minutes. Yield: 12 muffins
Bake cornbread. I like to use a muffin tin:
Process cornbread into crumbs:
Place day old bread in a processor...
... and process until you get fine crumbs:
Combine onion and celery and saute in butter until tender:
Then chop in processor:
Combine ingredients and place in a greased crockpot:
Cook on high for 1-1/2 to 2 hours or on low for 4-5 hours. This is a photo of some that has been partially eaten by all of us at the class I did last Saturday.
This is amazing creamy delicious. And it further proves to reiterate the inimitable futility and pointlessness of stuffing.
Yes, Yankees, southern women are smart, too. : )